Liner Install Instructions
Please read all instructions prior to installation.
Before beginning, determine if you will be doing your installation for the roof liner with the roof installed on the machine, or if you will be removing the roof. While some installs can be done with the roof in place it is easier and makes for a more accurate install if the roof is removed.
- The installation is recommended to be performed in an area that is at room temperature.
- We recommend having your machine as clean as possible, washing with soap and water and thoroughly rinsing and drying the surfaces that will be lined. Do not use any other protectants on the surface prior to application of liner.
- Test fitment of each piece in the position that corresponds with that piece on the surface to be lined. This gives you a good feel for how you will line up and apply each piece once the adhesive is exposed.
- Use the pictures provided below for each kit to aid with panel placement.
- Now that you have a good idea of how the pieces line up, prep the surface for application by removing any plastic burrs on the surface to be covered which can be done with a utility knife blade. Once burrs are removed, the final prep is to thoroughly clean the area with a clean cloth and rubbing alcohol. Once the rubbing alcohol has evaporated and the area is cleaned be careful not to contaminate it by touching it with bare hands or dirty cloth.
- Wipe the removable film on the back side of the foam to remove any dirt or debris.
- Now you are ready to apply. We recommend using an adhesive promotor on the areas you will be placing each piece. We like the Pro Prime Adhesive Promotor wipes.
- From whichever end you plan to start, peel back the first 2 or 3 inches of film exposing the adhesive, lay the piece into position, and once lined up lightly press on the area where there is exposed adhesive. Then carefully peel off the remaining film and lightly press the entire piece into place.
- Once the piece is lined up to your satisfaction firmly press the piece into place working from front to back applying pressure for 30 seconds on every section, a small roller that can be found at hardware stores works great for this.
- A heat gun, held at a safe distance, or a hairdryer can also be helpful when pressing the panels into place. It warms up the adhesive and will help you get a better seal.
- Continue installing each individual piece to the machine until all pieces have been installed.
- Once the entire install is complete go back and reapply pressure again over each piece that has been installed. This is a pressure sensitive adhesive. The more pressure applied, the better it will adhere.
- This is even more important for the door panels since the surface is more porous. The panels will require additional pressure applied after the initial installation if an adhesive promotor isn't used.
- Liner can be cleaned along with the rest of the machine with soap and water whenever you wash your machine.
- Now it’s time to enjoy your amazing new look and go for your next adventure!!!
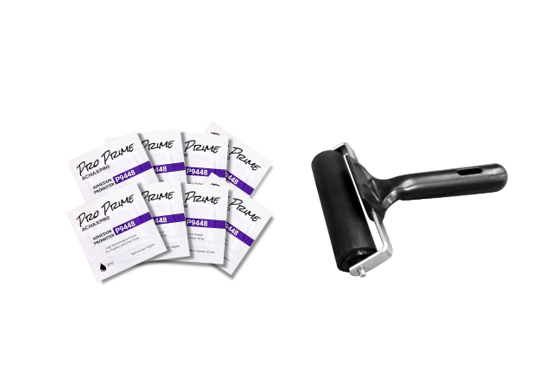
INSTALL AIDS
To ensure a flawless install of your kit, we recommend using an adhesive promoter, a small roller, and a heat gun/hairdryer.
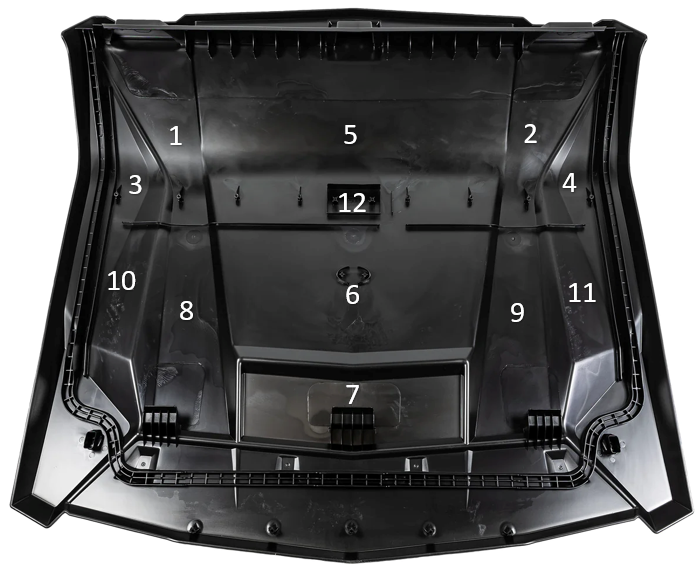
Panel Placement
General 2-Seater Headliner
There are corresponding numbers placed on each panel to aid in installation.
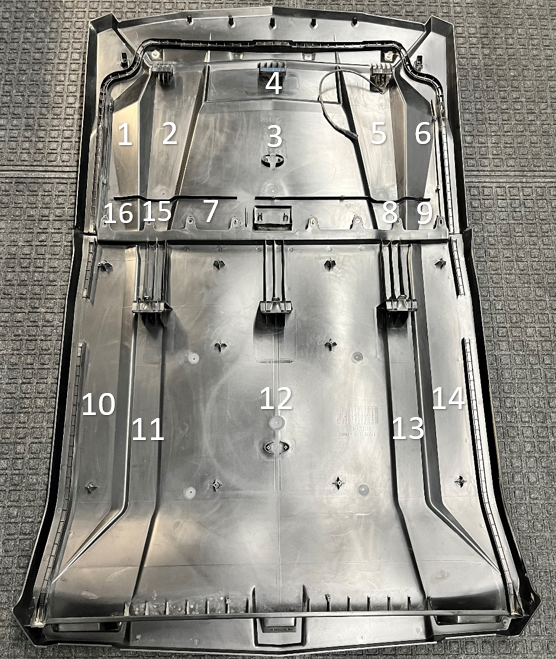
PANEL PLACEMENT
General 4-Seater Headliner
There are corresponding numbers placed on each panel to aid in installation.
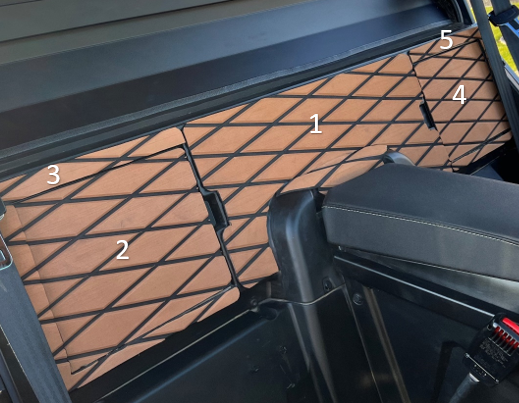
PANEL PLACEMENT
General 2 & 4-Seater Backwall
There are corresponding numbers placed on each panel to aid in installation.

PANEL PLACEMENT
General 2 & 4-Seater Front Doors
There are corresponding numbers placed on each panel to aid in installation.
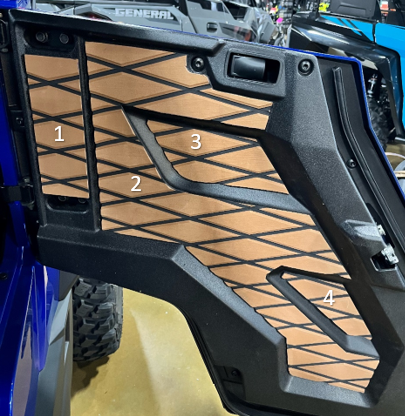
PANEL PLACEMENT
General 4-Seater Rear Doors
There are corresponding numbers placed on each panel to aid in installation.
PANEL PLACEMENT
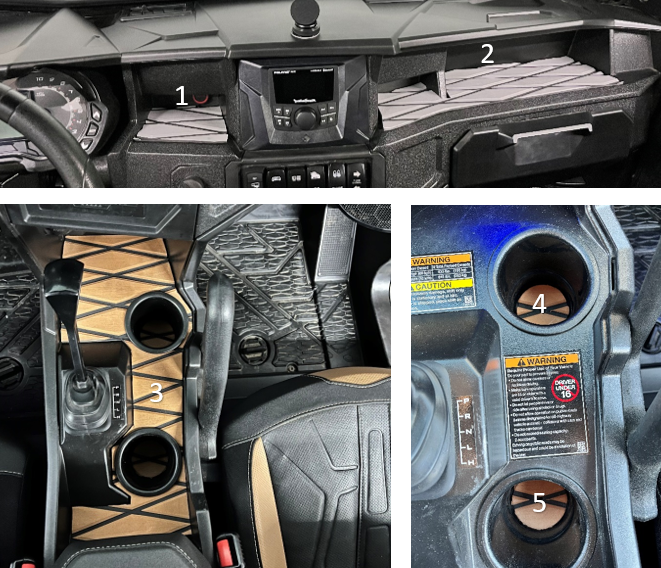
General Accessory
There are corresponding numbers placed on each panel to aid in installation.
Panel Placement
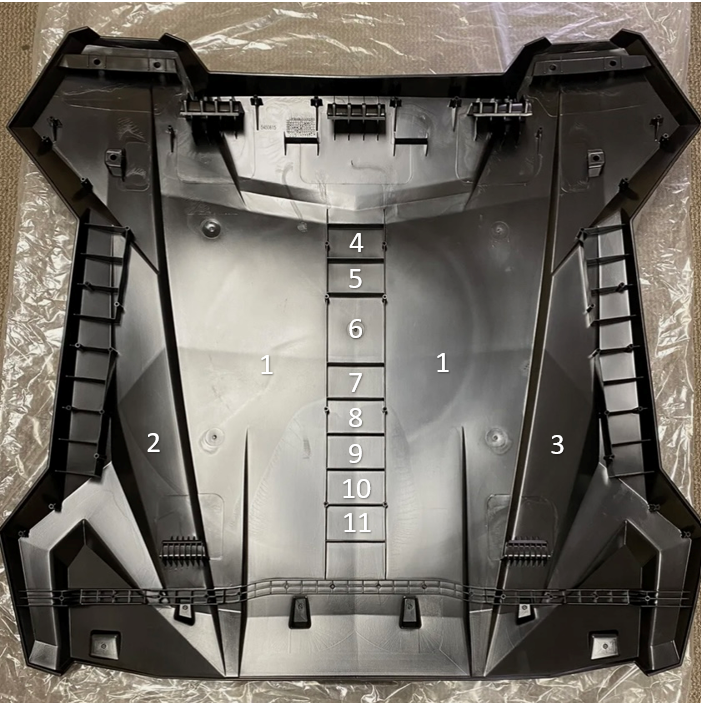
RZR 2-Seater Headliner
There are corresponding numbers placed on each panel to aid in installation.
PANEL PLACEMENT
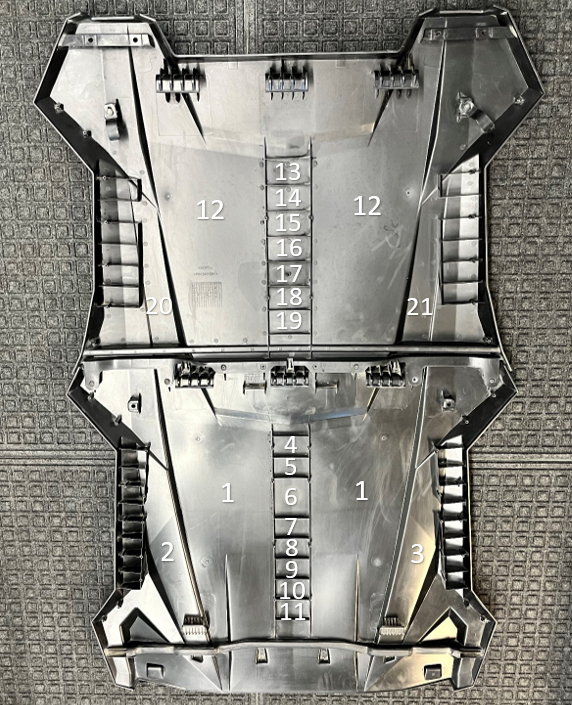
RZR 4-Seater Headliner
There are corresponding numbers placed on each panel to aid in installation.
PANEL PLACEMENT
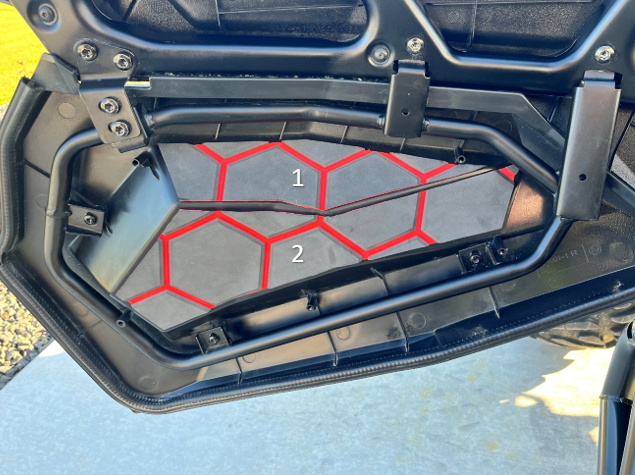
RZR 2 & 4-Seater Front Doors
There are corresponding numbers placed on each panel to aid in installation.
PANEL PLACEMENT
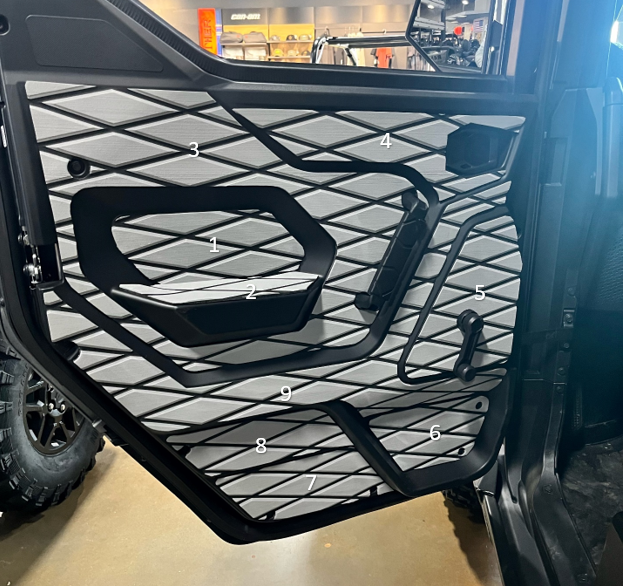
Xpedition 2 & 4-Seater Front Doors
There are corresponding numbers placed on each panel to aid in installation.

PANEL PLACEMENT
Xpedition 4-Seater Back Doors
There are corresponding numbers placed on each panel to aid in installation.
PANEL PLACEMENT
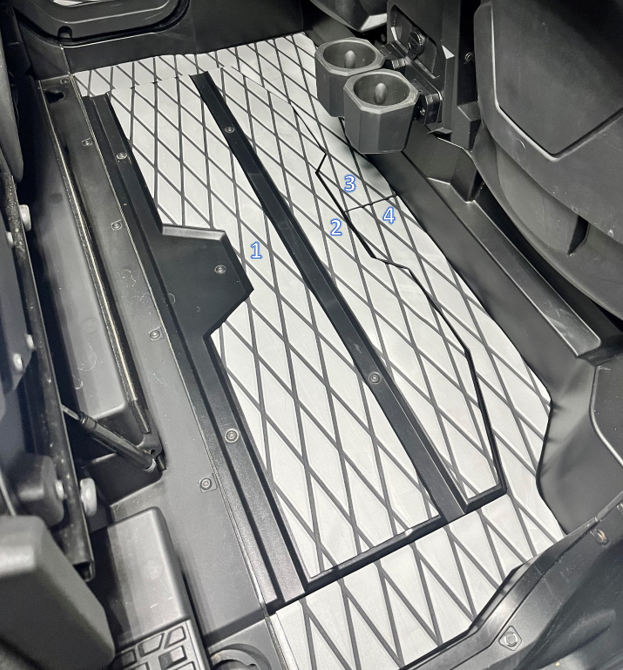
Xpedition 4-Seater Rear Floor Mat
There are corresponding numbers placed on each panel to aid in installation.
PANEL PLACEMENT
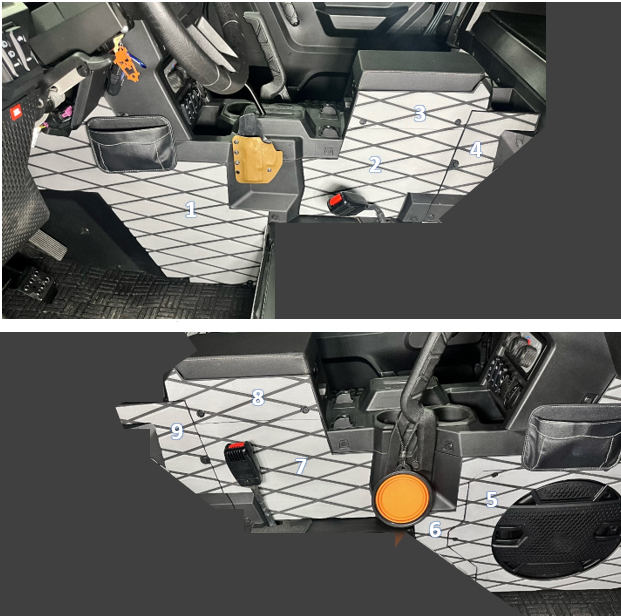
Xpedition 2-Seater Console
There are corresponding numbers placed on each panel to aid in installation.

PANEL PLACEMENT
Xpedition 4-Seater Console
There are corresponding numbers placed on each panel to aid in installation.
PANEL PLACEMENT
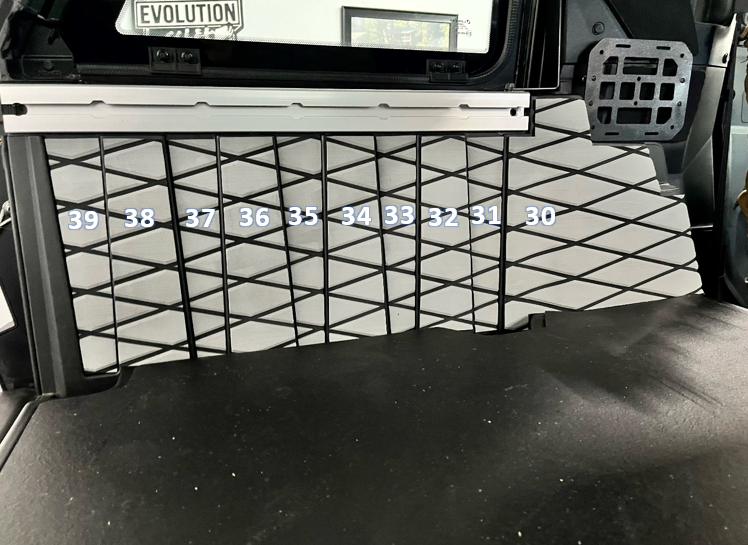
Xpedition Cargo Area Driver Side
There are corresponding numbers placed on each panel to aid in installation.
Please maintain the orientation of these pieces until installed. If care is not taken to maintain the orientation, it will be difficult to realign the pattern.

PANEL PLACEMENT
Xpedition Cargo Area Passenger Side
There are corresponding numbers placed on each panel to aid in installation.
Please maintain the orientation of these pieces until installed. If care is not taken to maintain the orientation, it will be difficult to realign the pattern.
PANEL PLACEMENT
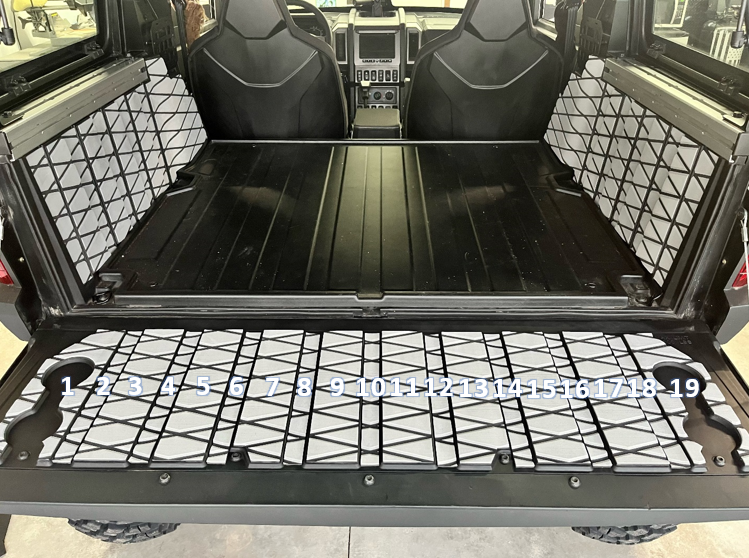
Xpedition Tailgate
There are corresponding numbers placed on each panel to aid in installation.
Please maintain the orientation of these pieces until installed. If care is not taken to maintain the orientation, it will be difficult to realign the pattern.
PANEL PLACEMENT
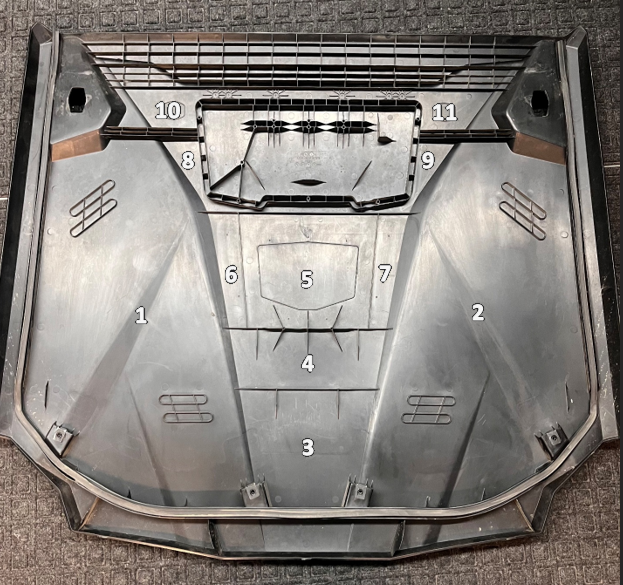
Can-Am Commander 2-Seater Headliner
There are corresponding numbers placed on each panel to aid in installation.
PANEL PLACEMENT
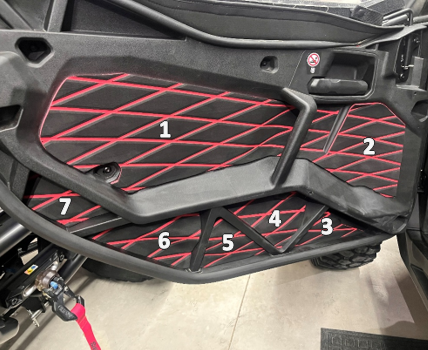
Can-Am Commander 2-Seater Driver Side Door
There are corresponding numbers placed on each panel to aid in installation.

PANEL PLACEMENT
Can-Am Commander 2-Seater Passenger Side Door
There are corresponding numbers placed on each panel to aid in installation.
PANEL PLACEMENT
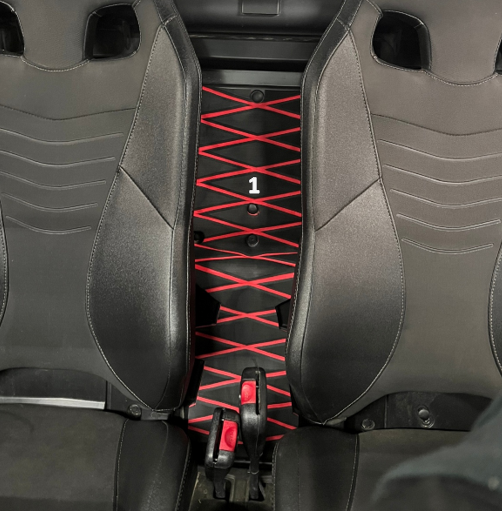
Can-Am Commander 2-Seater Middle Seat Panel
There are corresponding numbers placed on each panel to aid in installation.
PANEL PLACEMENT
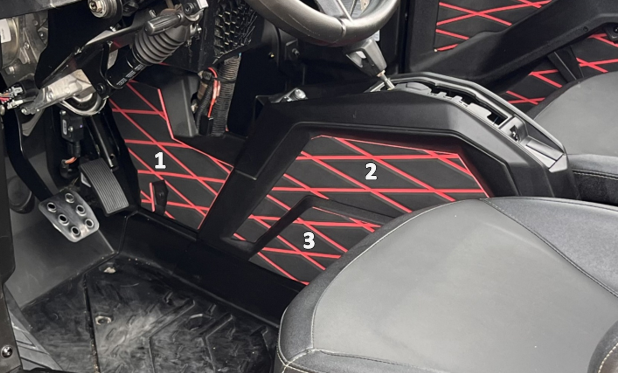
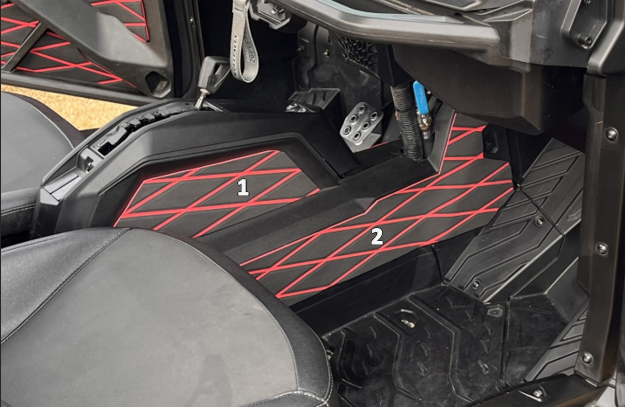
Can-Am Commander 2-Seater Drivers Side Console
There are corresponding numbers placed on each panel to aid in installation.
PANEL PLACEMENT
